 Taking a working Sonos system and moving to a bigger house should be simple. Sonos ‘just works’, right?
Well, away from the Labs I moved house last year to somewhere with a bit more space. The Sonos came with me and the first zone was unpacked early on the morning after the move as we began the unboxing. Since then it has never worked properly.. until this week.
Over the months I have tried various things to attempt to cure the drop-outs, unresponsive controllers and general grief. Here us some useful info to help anyone in the same situation:
1. SonosNet doesn’t like airwave congestion.
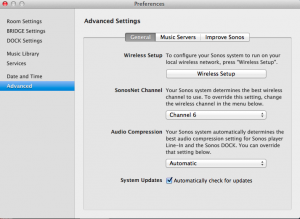 SonosNet is the built-in wireless networking of the Sonos system (although you can also get it to use your own wifi now). SonosNet is effectively a private, hidden wifi network and operates in the same air-space as your own wifi, DECT mobile phones and other wireless devices in the same waveband. For this reason, you should ensure your SonosNet is not on the same channel as your Wifi. It is simple to set this from the desktop controller preferences screen. Choices are Chanel 1, 6 or 11 and your Wifi should also be on one of these three.
2. Your wired connections aren’t necessarily being used.
Just because you have added wired connections either between Sonos components, or back to your router / switch doesn’t mean Sonos is using them. The next two points relate to this.
3. Sonos tries to keep ‘hops’ to a minimum, doesn’t necessarily use nodes you think it will.
It seems like Sonos components only like to be a maximum of two hops from each other. This means that if you try to improve coverage by adding say a Bridge Sonos Connect between two other components, it will ignore it because it would add another hop and therefore more latency.
4. Sonos uses Spanning Tree Protocol, so your network switch has to play nicely with this.
This is a bit network-engineer-techy. Because a Sonos system can have multiple connection paths between components, it needs a way to decide which one it will use – and it will only use one path at any given time. It uses something called Spanning Tree Protocol (or STP for short) to do this. If you have components connected via a network switch (which would include one built into your router if it has multiple network ports) then it has to play nicely with STP. By this I mean it either has to implement STP (eg. a managed switch), or pass STP information between connected devices. If it doesn’t do either of these, Sonos will ignore your wired network for connecting Sonos components together and just use SonosNet. Also bear in mind that the STP cost may have to be adjusted, depending on the STP protocol your switch is using.
5. If you have any wired connections, it will be using SonosNet, not your wifi.
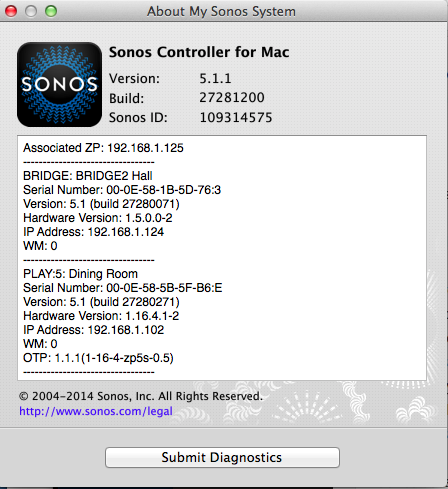
‘About my Sonos System’ screen
The recent additional option of connecting your Sonos to your Wifi means that you no longer need the first Sonos component to be wired to your router (or network). However, if any of your Sonos components have a wired connection, the whole system will revert back to SonosNet automatically. This is not obvious – the controller won’t tell you. The best way to confirm this is with the desktop controller – go to ‘About my Sonos System’ which shows you a list of your components. There is an option called WM – 0 means SonosNet, 1 means Wifi. If the Sonos component switches from one to the other, it will reboot. I have seen a component connected via a dodgy network cable continually switch between the two, rebooting each time.
6. Your Sonos system provides diagnostics (but they are not really for you to look at).
Sonos components provide a web interface which can give you a better picture of what is going on. Find the IP of a component using the ‘About my Sonos System’ screen above. Then connect to: http://<your IP:1400/support/review for example on my system: http://192.168.1.102:1400/support/review
On a large system (or one with dodgy networking) this can take a while to return a page, or if your system is really bad, it can fail altogether some of the time. The page will show a list of your components, each of which can be expanded to list a whole load of stuff, most of which I ignore. There are two particularly useful diagnostics though.
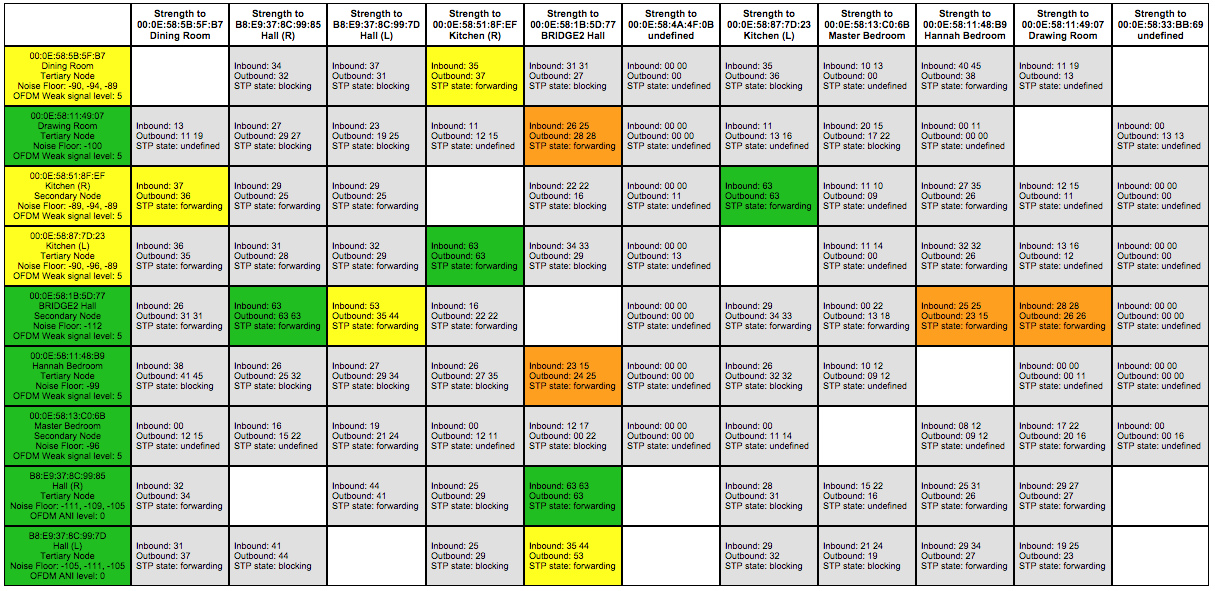
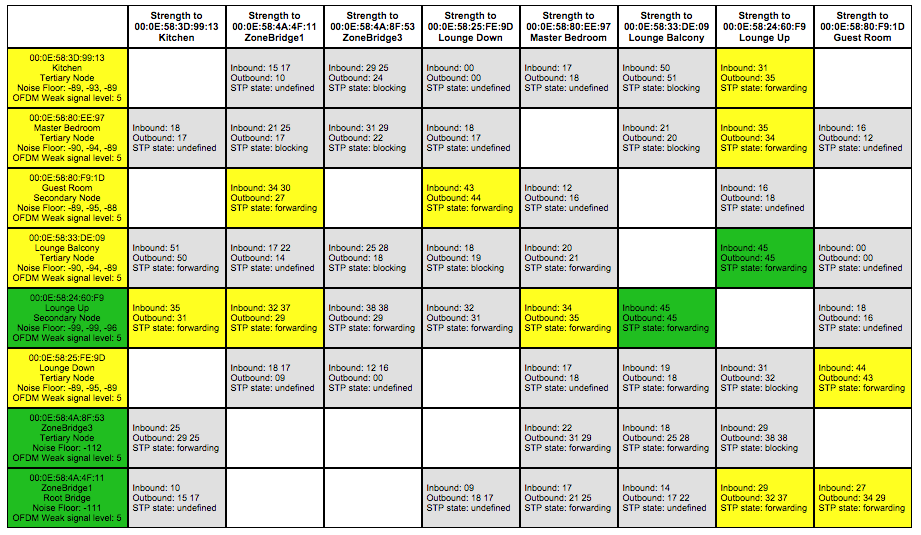
At the bottom of the list is Network Matrix. This gives a tabular view of your Sonos components. Each one is listed along the top and down the left of the table. Here is what mine looks like now (ignore the undefined columns which are components currently turned off):

Some important points to look for on your matrix.
- Look at the colours – green is best, then yellow, orange, and worst is red. These are quality of wireless network to/from the device. An all-grey column/row indicates no wireless connections on that component. You may get for a wired component which is not participating in the SonosNet.
- Look at the Inbound / Outbound numbers. They give signal strength and go up to 64. Low numbers are worst.
- Coloured squares in the matrix show what is wirelessly connected to what. This will give you an idea of the path your music data takes.
- There should only be one empty box per row/column on the matrix. This is where the same component meets on the row/column. If you have more empty boxes, then you have communication problems. Take a look at this matrix. The signal strength is all ok, but there are more blanks than there should be. This will (and does) result in drop-outs, controller delays etc.:
7. Any one poor link in the mesh has the ability to affect the whole system.
Each Sonos zone has a media player which tries to maintain ‘subscriptions’ to all other media players. Also each controller tries to keep tabs of what each zone is up to (think about the Zones screen). If you have one badly connected zone, this will cause problems somewhere, whether its playback, poor controller response etc. The last matrix shows a system in a state where this happens. Everything works great for a while, then picking up a CR200 controller results in playback drop-out from a zone wired directly to the NAS!
8. Sonos provides ongoing support – and its good.
Sonos support have seen all this stuff before, and with access to the diagnostics can pinpoint problems. There is a built-in mechanism for getting this diagnostics to them – the ‘About my Sonos System’ screen (shown above in point 5) has a ‘Submit DIagnostics’ button. This will capture the state of the system and can be used straight after you have a problem to help Sonos Support.
Finally..
From learning all this, out of the many things I tried, I think these are the steps which made it all work in the end:
1. Install a managed switch. Set the STP cost on the Sonos ports to 10 (for 100Mbps) from the default of 19.
2. Wire network connections from the switch to key Sonos components at various points around the house.
3. Make sure the home Wifi was not on the same channel as the Sonos. I ended up with Sonos on 6, and Wifi on 1 and 11 (one at each end of the house).
Happy Listening!
 Out of the box, Freedomotic logging output currently goes to the console. When you start the application, you see a whole load of messages streaming past you on the screen – very messy.